My version of Urban Beekeeping.
My bees did not make it through the winter. I figured that with all the other new beekeepers in the City last year that the chances of catching a swarm were good. Instead of ordering a new package of bees to replace my dead bees, I ordered a swarm lure and planned on catching a swarm.
Late in May I put together a swarm trap that was the equivalent of two 5-frame nucs stacked on top of each other. In the top section was one frame with a piece of old dark brown brood comb held in by rubber bands. I also placed four frames with 1 inch wax strips in the top.
In the bottom section I place a nail just above the entrance with a swarm lure attached to it.
The picture below show the swarm trap shortly before I deployed it about 15 feet up in a scrub tree in my backyard in Brooklyn.
Two-nuc high swarm trap
About two weeks later I noticed bees flying in and out of the trap. I decided to wait until the following weekend to move them into a “real” hive.
Bees going in and out of swarm trap
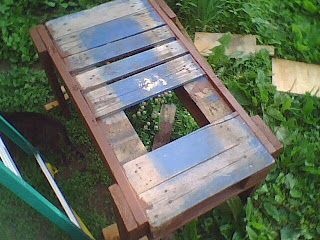
I built a hive stand by cutting a salvaged blue shipping pallet in half. I used some pieces of salvaged 2x6 planks that I found in a dumpster at the subway station near Kings Highway to build the sides and legs, which I painted brown.
After the brown paint dried, I removed one blue board to make a hole that would be under the screened bottom board. The remaining blue boards were painted off-white/yellow like the rest of the new hive equipment I have.
This hive stand was so over-built that it could easily hold two hives so I started thinking of it as a hive “carrier”.
Hive Stand v 2 with legs, Side View
Hive Stand v 2 with legs and hole for screened bottom board
I painted another shipping pallet, with closely spaced boards the same off white so that any bees that fell on it could be seen and rescued rather then stepped on. This painted pallet and two more salvaged blue pallets were placed on top of plastic coke bottle cases to keep them off the wet ground.
The completed hive carrier was “docked” a couple of inches away from the pallets so that the banging and thumping and stomping about of the bee keeper would not be conducted to the bees in their hive.
Hive Port with one Hive Carrier ready for swarm transfer.
I placed the screened bottom board over the “observation hole” that I planned to use to peer up into the hive next winter to make sure that the cluster had moved up above the bottom brood box.
Screened botom board over observation hole in Hive Carrier
I added a queen “includer” adapted from a 10 frame queen excluder using some duct tape over the screened bottom board to keep the swarm queen from leaving the hive.
Screned bottom board with Queen Includer positioned
I then used some partially drawn frames of comb from last year to make sure everything fit and was aligned correctly.
Practice load of new swarms hive with old frames
The picture below was taken after I moved the swarm into it’s new home in the single 8-frame medium brood box on top of the hive carrier. I nailed the swarm lure on the outside of the new brood box just above the hive entrance to help confused bees find their way to their new home. (For he remainder of the afternoon there were considerable numbers of bees flying about up in the tree saying “????!!!”.)
I piled the other medium boxes I had purchased for my planned two-hive bee yard in a tall stack positioned to provide shade for the new hive.
Nearby I placed a white water bucket with floating corks from a local bar to keep the bees from drowning.
Hive Port w newly installed swarm and spare equipment to provide afternoon shade
The swarm was making a living by robbing unconsumed honey from a hole in the 10-frame dead out, so early this morning I transferred all the frames into the stack of new equipment and made sure it was sealed to prevent robbing.
I took the old equipment inside to be patched and painted to match the new boxes.
The old equipment was stacked on top of a cut-in-half blue shipping pallet so my next step will be to transform that into another “hive carrier” by adding sides and legs and a matching paint job.
That should complete my planned Hive Port which will consist of a painted “dock” with Hive Carriers floating on each side of it and a warf side plywood covered staging area.


